|
Source Code Editor Overview |

  
|
|
Source Code Editor Overview |
|
MENU ACCESS
Program -> Program Editor or Tool bar Button -> Program
When you click on one of these options the following screen will be displayed.
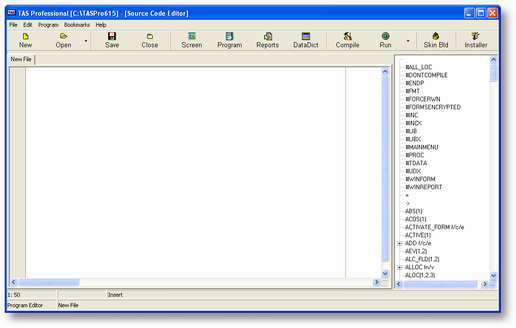
On the right side of the screen you will see a tree listing of all the commands and functions for TAS Professional. As with a standard tree structure, some of the items (commands only) have a plus (+) sign to the left of the entry. If you click on this symbol the options for the command will be displayed.
If you double click on a command (or option, function, etc.) it will be inserted in your code at the current cursor location. If you double click on a command name that has sub-options, the entire command, including all the sub-options, will be inserted into your source file. You can then remove the items that you don't need.
The source editing form is very similar to a standard Windows® editor, except that the lines don't wrap when you get to a certain line length. Most of the features you would expect are part of this editor, including cut, copy and paste; drag and drop, etc. There are a couple of other options that are unique to a source code editor that you may not be familiar with, these are:
| Goto Line: | Each line in your source file has a line number. The numbering starts from 1 and the lines are numbered sequentially, including all blank lines, etc. The current line and column location are displayed in the left column immediately after the source editing area. To go to a specific line press the CTRL+G keys. A dialog box will be displayed and you can enter a line number. |
| Bookmarks: | You can put up to 10 different bookmarks in the source file. These are not saved with the source file, but, are active as long as the file is being edited. What they allow you to do is mark a specific line. Then you can return to that line by pressing the appropriate keys or choosing the bookmark from the Bookmark menu option at the top of the screen When you set a bookmark on a line a small block with the appropriate number (0-9) is placed in the gutter (space to the left of the editing area). |
To set a bookmark from the keyboard, press the CTRL+K+number keys where number must be 0-9. To return to the bookmarked line press the CTRL+Q+number key. To turn off a bookmark press the same CTRL+K+number keys you used to set it. Also, you can 'move' a bookmark to another line by doing the same on a different line than it was originally set.
Undo/Redo:If you make changes to the source file that you find you really don't want the easiest way to get rid of them is through the Undo feature. This option (along with Redo) is on the Edit menu. To undo changes from the keyboard enter the CTRL+Z keys, to redo (reverse the undo) enter the SHIFT+CTRL+Z keys. This is a very valuable feature and one you'll probably use often.
| Find: | Standard Windows® find option. This is on the Edit menu. From the keyboard use the CTRL+F keys. |
| Replace: | Standard Windows® find and replace option. This is on the Edit menu. From the keyboard use the CTRL+R keys. |
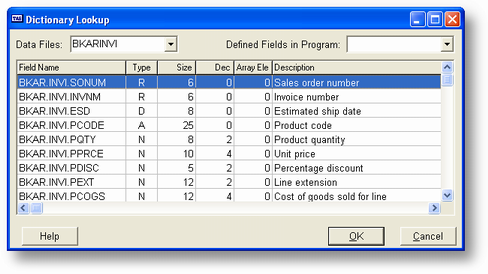
| Lookup: | An option unique to TAS Professional is the ability to search for field names using the same lookup routine you first saw in the screen editor. This option is also on the Editor menu or you can enter the CTRL+L keys. The field lookup dialog is displayed. If you choose a field (double click on the field name or press the OK button) it will be inserted into the code at the cursor location. |
Convert Remarks: Remarks are messages to the future that you, or someone who might follow you, will refer to when trying to figure out what you were doing in a piece of program code. The more remarks you put the easier it will be to maintain or modify the program in the future. In TAS Professional there are two 'normal' ways of specifying remarks. If the remark is going to be short, a single line or less, you would use "//" (two forward slashes). Everything after the remark, on that same line, will be ignored when the program is compiled.
The second option is when you're going to have a remark that is going to take multiple lines. You can use the // remark at the beginning of each line or you can start the remark with "(*" (parenthesis + asterisk) and will continue over as many lines as you wish, until you put the closing characters which are the "*)" (asterisk + closing parenthesis).
In previous versions of TAS Professional the semi-colon (;) was the remark character, and that will still work in the compiler. However, the source editor doesn't recognize that as a remark. So, if you choose this option on the Edit menu, the editor will change all of the old remarks (;) to new (//).
CTRL + A Select all text
CTRL + F Will bring up the find & replace option dialog.
CTRL + G Goto Line number.
| CTRL + O | Open Souce code dialog. |
CTRL + P Print Dialog.
| CTRL + R | Replace dialog. |
CTRL + S Save to disk.
| CTRL + Z | Goto end. |
Right Click Options Menu
If you use your right click button on your mouse the following poupmenu will be displayed.
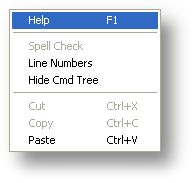
Help F1 From this menu you can get help on any TAS professional Command or function.
Spell Check If you have highlighted text in the editor use the Spell Check option.
Line Numbers By default the editor will not display line numbers if you click on this option a list of line numbers will display.
Cut Ctl+X If you have Highlighted text you want to Cut and palce in the windows clipboard click on this option.
Copy Ctrl+C If you have Highlighted text in the program editor this option will copy that text into the windows clipboard.
| Paste Ctrl+V | If you have cut or copied information into the windows clipboard place this option to paste that information into your source code. |
| The Behavior and colors used in this source code editor can be customized using the TP7Setup.exe program. or by making changes to the TASPRO.INI file. |
| CTRL+L | Lookup a data dictionary field this can be a database field name or an field that has been defined in your program. |
You can use the Data Dictionary window in the editor.
Click the data dict This will display a three grid display. The first is the file names in FILELOC.DBF. The second is this list of fields in the FD for that file. And the third is the key names for that FD. Click on any file name and the FD information will change. Since ver 7.4 we have added a feature to use this display to copy table/filenames field names and key names into the source code edior. doubleclick on the information you want to copy into the editor and it will be copied at current cursor position.

Page url: http://www.cassoftware.com/tas/manual/sourcecodeeditoroverview.htm